Related Plugins and Tags

QGIS Planet

Goodbye WordPress, goodbye GIS Unchained

Hello all,

Some time ago, I have become a freelancer worker. For this reason, I decided to move away from wordpress.com and this kind of hobby blog and make a bit more professional website. It took some time, but it’s ready now!

www.aneto.pt

I have move all the blog content to the new website. When it makes sense, I will try to update it to newer versions of QGIS and create new content regularly. Please follow me there. If you were following me using the RSS Feed, you can start using the following URL.

As a farewell (and welcome) gift, here’s my brand new post there:
Create a PyQGIS Development Environment Using Conda and VScode

Thank for being around,

Alexandre Neto

Configure editing form widgets using PyQGIS

PT | EN

As I was preparing a QGIS Project to read a database structured according to the new rules and technical specifications for the Portuguese Cartography, I started to configure the editing forms for several layers, so that:

  1. Make some fields read-only, like for example an identifier field.
  2. Configure widgets better suited for each field, to help the user and avoid errors. For example, date-time files with a pop-up calendar, and value lists with dropdown selectors.

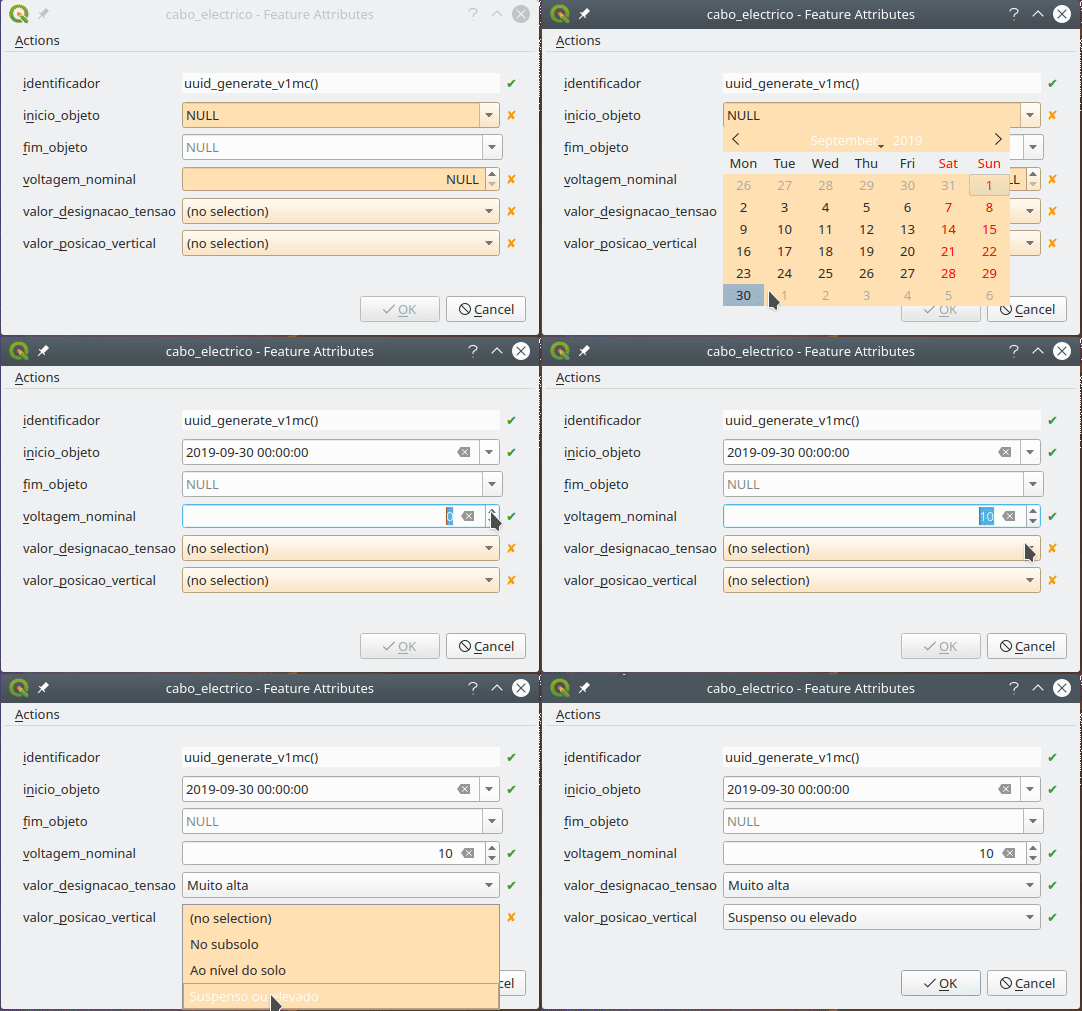
Basically, I wanted something like this:

Peek 2019-09-30 15-04_2

Let me say that, in PostGIS layers, QGIS does a great job in figuring out the best widget to use for each field, as well as the constraints to apply. Which is a great help. Nevertheless, some need some extra configuration.

If I had only a few layers and fields, I would have done them all by hand, but after the 5th layer my personal mantra started to chime in:

“If you are using a computer to perform a repetitive manual task, you are doing it wrong!”

So, I began to think how could I configure the layers and fields more systematically. After some research and trial and error, I came up with the following PyQGIS functions.

Make a field Read-only

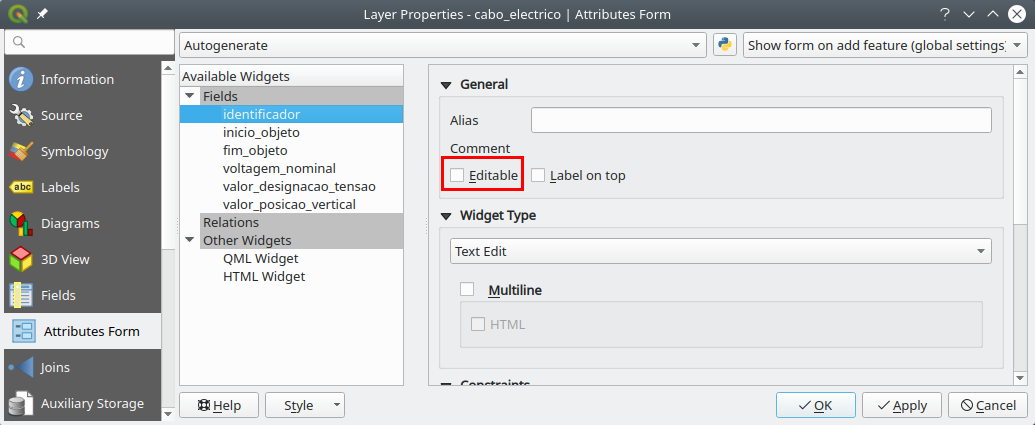
The identifier field (“identificador”) is automatically generated by the database. Therefore, the user shouldn’t edit it. So I had better make it read only

Layer Properties - cabo_electrico | Attributes Form_103

To make all the identifier fields read-only, I used the following code.

def field_readonly(layer, fieldname, option = True):
    fields = layer.fields()
    field_idx = fields.indexOf(fieldname)
    if field_idx >= 0:
        form_config = layer.editFormConfig()
        form_config.setReadOnly(field_idx, option)
        layer.setEditFormConfig(form_config)

# Example for the field "identificador"

project = QgsProject.instance()
layers = project.mapLayers() 

for layer in layers.values():
    field_readonly(layer,'identificador')

Set fields with DateTime widget

The date fields are configured automatically, but the default widget setting only outputs the date, and not date-time, as the rules required.

I started by setting a field in a layer exactly how I wanted, then I tried to figure out how those setting were saved in PyQGIS using the Python console:

>>>layer = iface.mapCanvas().currentLayer()
>>>layer.fields().indexOf('inicio_objeto')
1
>>>field = layer.fields()[1]
>>>field.editorWidgetSetup().type()
'DateTime'
>>>field.editorWidgetSetup().config()
{'allow_null': True, 'calendar_popup': True, 'display_format': 'yyyy-MM-dd HH:mm:ss', 'field_format': 'yyyy-MM-dd HH:mm:ss', 'field_iso_format': False}

Knowing this, I was able to create a function that allows configuring a field in a layer using the exact same settings, and apply it to all layers.

def field_to_datetime(layer, fieldname):
    config = {'allow_null': True,
              'calendar_popup': True,
              'display_format': 'yyyy-MM-dd HH:mm:ss',
              'field_format': 'yyyy-MM-dd HH:mm:ss',
              'field_iso_format': False}
    type = 'Datetime'
    fields = layer.fields()
    field_idx = fields.indexOf(fieldname)
    if field_idx >= 0:
        widget_setup = QgsEditorWidgetSetup(type,config)
        layer.setEditorWidgetSetup(field_idx, widget_setup)

# Example applied to "inicio_objeto" e "fim_objeto"

for layer in layers.values():
    field_to_datetime(layer,'inicio_objeto')
    field_to_datetime(layer,'fim_objeto')

Setting a field with the Value Relation widget

In the data model, many tables have fields that only allow a limited number of values. Those values are referenced to other tables, the Foreign keys.

In these cases, it’s quite helpful to use a Value Relation widget. To configure fields with it in a programmatic way, it’s quite similar to the earlier example, where we first neet to set an example and see how it’s stored, but in this case, each field has a slightly different settings

Luckily, whoever designed the data model, did a favor to us all by giving the same name to the fields and the related tables, making it possible to automatically adapt the settings for each case.

The function stars by gathering all fields in which the name starts with ‘valor_’ (value). Then, iterating over those fields, adapts the configuration to use the reference layer that as the same name as the field.

def field_to_value_relation(layer):
    fields = layer.fields()
    pattern = re.compile(r'^valor_')
    fields_valor = [field for field in fields if pattern.match(field.name())]
    if len(fields_valor) > 0:
        config = {'AllowMulti': False,
                  'AllowNull': True,
                  'FilterExpression': '',
                  'Key': 'identificador',
                  'Layer': '',
                  'NofColumns': 1,
                  'OrderByValue': False,
                  'UseCompleter': False,
                   'Value': 'descricao'}
        for field in fields_valor:
            field_idx = fields.indexOf(field.name())
            if field_idx >= 0:
                print(field)
                try:
                    target_layer = QgsProject.instance().mapLayersByName(field.name())[0]
                    config['Layer'] = target_layer.id()
                    widget_setup = QgsEditorWidgetSetup('ValueRelation',config)
                    layer.setEditorWidgetSetup(field_idx, widget_setup)
                except:
                    pass
            else:
                return False
    else:
        return False
    return True
    
# Correr função em todas as camadas
for layer in layers.values():
    field_to_value_relation(layer)

Conclusion

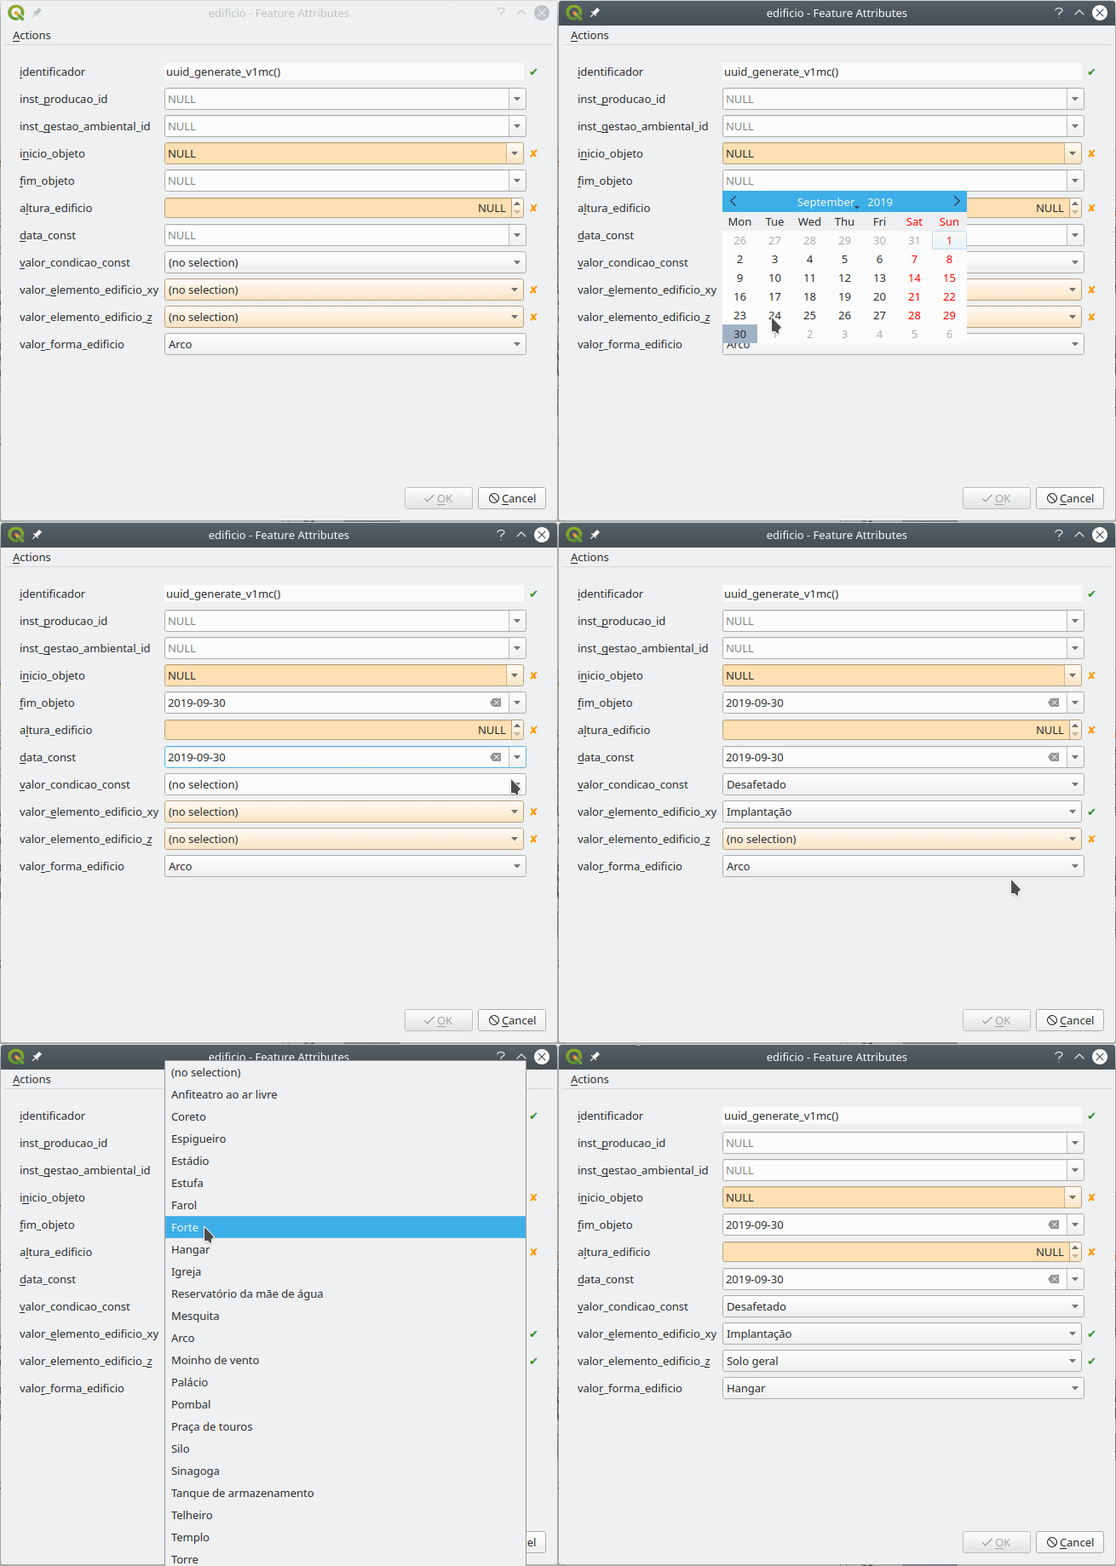
In a relatively quick way, I was able to set all the project’s layers with the widgets I needed.Peek 2019-09-30 16-06

This seems to me like the tip of the iceberg. If one has the need, with some search and patience, other configurations can be changed using PyQGIS. Therefore, think twice before embarking in configuring a big project, layer by layer, field by fields.

Using QGIS from Conda

QGIS recipes have been available on Conda for a while, but now, that they work for the three main operating systems, getting QGIS from Conda is s starting to become a reliable alternative to other QGIS distributions. Anyway, let’s rewind a bit…

What is Conda?

Conda is an open source package management system and environment management system that runs on Windows, macOS and Linux. Conda quickly installs, runs and updates packages and their dependencies. Conda easily creates, saves, loads and switches between environments on your local computer. It was created for Python programs, but it can package and distribute software for any language.

Why is that of any relevance?

Conda provides a similar way to build, package and install QGIS (or any other software) in Linux, Windows, and Mac.

As a user, it’s the installation part that I enjoy the most. I am a Linux user, and one of the significant limitations is not having an easy way to install more than one version of QGIS on my machine (for example the latest stable version and the Long Term Release). I was able to work around that limitation by compiling QGIS myself, but with Conda, I can install as many versions as I want in a very convenient way.

The following paragraphs explain how to install QGIS using Conda. The instructions and Conda commands should be quite similar for all the operating systems.

Anaconda or miniconda?

First thing you need to do is to install the Conda packaging system. Two distributions install Conda: Anaconda and Miniconda.

TL;DR Anaconda is big (3Gb?) and installs the packaging system and a lot of useful tools, python packages, libraries, etc… . Miniconda is much smaller and installs just the packaging system, which is the bare minimum that you need to work with Conda and will allow you to selectively install the tools and packages you need. I prefer the later.

For more information, check this stack exchange answer on anaconda vs miniconda.

Download anaconda or miniconda installers for your system and follow the instructions to install it.

Windows installer is an executable, you should run it as administrator. The OSX and Linux installers are bash scripts, which means that, once downloaded, you need to run something like this to install:

bash Miniconda3-latest-Linux-x86_64.sh

Installing QGIS

Notice that the Conda tools are used in a command line terminal. Besides, on Windows, you need to use the command prompt that is installed with miniconda.

Using environments

Conda works with environments, which are similar to Python virtual environments but not limited only to python. Basically, it allows isolating different installations or setups without interfering with the rest of the system. I recommend that you always use environments. If, like me, you want to have more that one version of QGIS installed, then the use of environments is mandatory.

Creating an environment is as easy as entering the following command on the terminal:

conda create --name <name_of_the_environment>

For example,

conda create --name qgis_stable

You can choose the version of python to use in your environment by adding the option python=<version>. Currently versions of QGIS run on python 3.6, 3.7, 3.8 and 3.9.

conda create –name qgis_stable python=3.7

To use an environment, you need to activate it.

conda activate qgis_stable

Your terminal prompt will show you the active environment.

(qgis_stable) aneto@oryx:~/miniconda3$

To deactivate the current environment, you run

conda deactivate

Installing packages

Installing packages using Conda is as simples as:

conda install <package_name>

Because conda packages can be stored in different channels, and because the default channels (from the anaconda service) do not contain QGIS, we need to specify the channel we want to get the package from. conda-forge is a community-driven repository of conda recipes and includes updated QGIS packages.

conda install qgis --channel conda-forge

Conda will download the latest available version of QGIS and all its dependencies installing it on the active environment.

Note: Because conda always try to install the latest version, if you want to use the QGIS LTR version, you must specify the QGIS version.

conda install qgis=3.10.12 --channel conda-forge

Uninstalling packages

Uninstalling QGIS is also easy. The quickest option is to delete the entire environment where QGIS was installed. Make sure you deactivate it first.

conda deactivate
conda env remove --name qgis_stable

Another option is to remove QGIS package manually. This is useful if you have other packages installed that you want to keep.

conda activate qgis_stable
conda remove qgis -c conda-forge

This only removes the QGIS package and will leave all other packages that were installed with it. Note that you need to specify the conda-forge channel. Otherwise, Conda will try to update some packages from the default channels during the removal process, and things may get messy.

Running QGIS

To run QGIS, in the terminal, activate the environment (if not activated already) and run the qgis command

conda activate qgis_stable
qgis

Updating QGIS

To update QGIS to the most recent version, you need to run the following command with the respective environment active

conda update qgis -c conda-forge

To update a patch release for the QGIS LTR version you run the install command again with the new version:

conda install qgis=3.10.13 -c conda-forge

Some notes and caveats

Please be aware that QGIS packages on Conda do not provide the same level of user experience as the official Linux, Windows, and Mac installer from the QGIS.org distribution. For example, there are no desktop icons or file association, it does not include GRASS and SAGA, etc …

On the other hand, QGIS installations on Conda it will share user configurations, installed plugins, with any other QGIS installations on your system.

Fourth report

What do I have completed this week?

  • The progress signal is successfully connected to both progress bar (when running from the console) and AlgorithmDialog (When using the processing toolbox).
  • Fixed the bug that makes the algorithm return “None”.
  • Fixed the bug that makes QGIS crash (sometimes) after the first time we run the algorithm.
  • The multithreading on the AlgorithmDialog seems to work fine.
  • More general implementation that allows to test the multithreading with any algorithm.

What am I going to achieve for the next week?

  • Solve the issue with the outputs.
  • Figure out why the processAlgorithm is not being called.
  • Test the algorithms on python console and AlgorithmDialog.
  • Bug fixes.

Is there any blocking issue?

  • Problem loading the outputs from the algorithm.
  • Have some university deadlines that may affect my work time on the project.


Third report

What do I have completed this week?

  • Using signals from the GeoAlgorithm to print the progress on QGIS python console
  • Code refactoring
  • Debugging
  • Multithread when running the algorithm through the AlgorithmDialog

What am I going to achieve for the next week?

  • Finish the multithread on the AlgorithmDialog
  • Connect the progress signal to the progress bar
  • Fix a bug that makes QGIS crash (sometimes) after the first time we run the algorithm
  • Fix a bug that makes the algorithm return “None”

Is there any blocking issue?

Last week I had less time to work on the project due to my university exams and projects. I still have some university projects to finish till the end of the semester that may affect GSoC in the next week.


  • Page 1 of 1 ( 5 posts )
  • sem categoria

Back to Top

Sustaining Members